4 Stunningly Simple Apps to Get You Organized

We can all get a little scatterbrained from time to time. Lost keys, wallets, and a variety of other items can derail your life for weeks or more.
Fortunately, a few apps and tools can help you out when you need to locate a lost item. Here are four to help you stay organized, keep track of your stuff, and get out of trouble when you misplace anything important in the future.
 USE YOUR PHONE’S CAMERA APP TO CATALOG IMPORTANT ITEMS
Every smartphone comes with a camera app so you don’t have to download anything to have one of the best cataloging tools at your disposal. You can use your smartphone camera to take photographs of where you put important items so you have a visual record if you need to find them. This can be anything from lost keys, wallets, your favorite camera, or anything else. It’s also a great way to track where you parked your car or track items you want to purchase that you see in a store. You have lots of options so don’t neglect your camera! It’s a fantastic organizational tool.
That said, if you just save all your photos to the general camera roll, you’re not going to be able to find them easily. You can avoid this problem two different ways:
- Create albums in your smartphone’s photos app and save any organized images there. (I prefer this method for its simplicity.)
- Download a camera app (like Camera+ for iPhone or Google Camera for Android) and use it solely for saving organization photos. You can also use a dedicated inventory app (like MyStuff2 for iPhone and The Home Inventory App for Android) if you want to get detailed.
Whenever you need to find something, just consult your photos. And this inventory is just the beginning. Your smartphone camera can do quite a lot more than I’ve detailed here. For more tips and tricks, check out this post.
 TRACK ITEMS YOU LOSE WITH TILE
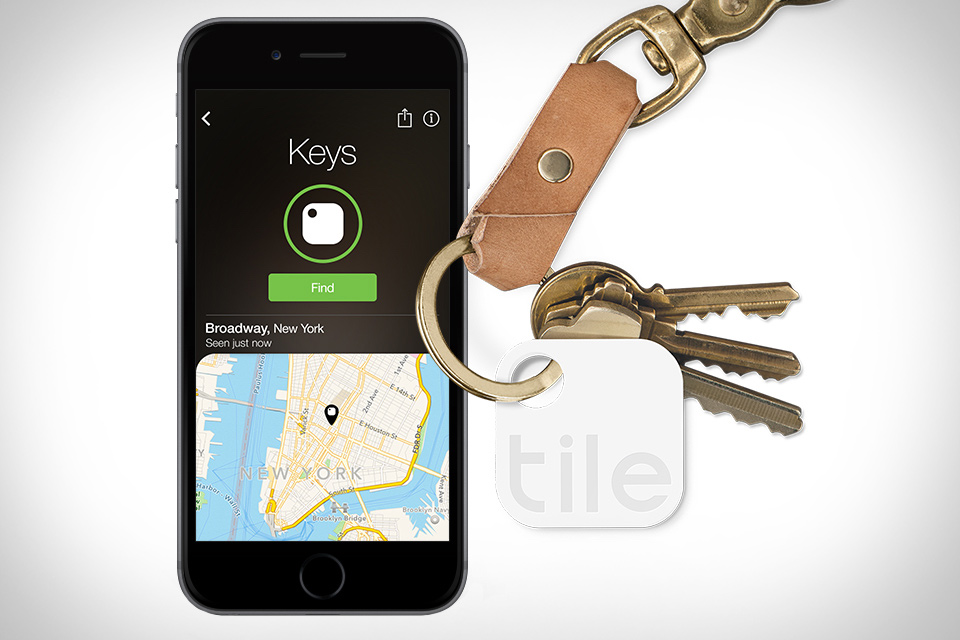
A lot of Bluetooth trackers exist on the market today, and I’ve tested most of them. Some work and some don’t work at all. Although imperfect at times, only Tile proved reliable for me. You simply clip or stick it on to the item you want to keep track of and you can use your phone to locate it with a couple of taps.
Tile costs $25 for just one of them, but if you plan to track multiple items you can order a four pack to get the cost down to $17.50 each (or an eight pack for $16.25 each). Each Tile comes with a hole for easily adding it to a key ring. You’ll also get a couple of adhesive stickers for attaching a Tile to a remote control or wallet.
Once you get your Tile(s), you’ll need to pair them with your iPhone or Android in order to start tracking. Here are the steps to follow:
- Download the Tile app for iPhone or Android, open it up, and create an account.
- Tap the + button at the top of the screen to add a new Tile.
- You’ll see these instructions on screen, but basically you’ll need to press firmly on the “e” on your Tile and place it right next to your smartphone until it starts to sing. The Tile app will take care of the pairing process from there.
- Once your Tile is paired, just name it and add a photo of the item you want to track (if you want to).
- Attach your Tile to the item you want to track and you’re all set!
When you need to find a lost item, just jump into the Tile app, tap what you want to find, and tap the green “Find” button. The Tile will start to sing and the app will tell you how close you are to the lost item as well as its last known location. If you lose the item and your phone is out of range, you can mark it as lost and other Tile users that encounter it will automatically record its location with their app. That way you can recover things even if you’re not near the lost item anymore.
YOU HAVE LOTS OF OPTIONS SO DON’T NEGLECT YOUR CAMERA! IT’S A FANTASTIC ORGANIZATIONAL TOOL.
 REPLACE LOST KEYS WITH KEYME
If you don’t want to rely on other users being in range of your lost items to recover them, KeyMe offers another way deal with lost keys.
We probably misplace our keys more than anything else and KeyMe offers a very simple solution to getting them back in a pinch. Just download the app or visit a local key copier kiosk to scan pretty much any house, car, motorcycle, mailbox, cabinet, and safe key you want. You can copy it right there or save it for later using a fingerprint. This way you’ve got a solid backup plan in place if you’re ever locked out, lose your keys or need a key for any reason at a moment’s notice. Just head to your local kiosk and scan your fingerprint to copy a new one.
The KeyMe app is super simple to use. Personally, I’ve had to change my deadbolt three times this year because I had the bad luck of buying faulty ones and that meant new keys every time. After installing the deadbolt, I took pictures of the keys with KeyMe and ordered copies. Scanned keys can be ordered by mail directly from the app. KeyMe also allows sending your scanned keys to friends and family in case they need a copy, which was useful when providing copies to my roommate and landlord. If I ever lose those keys in the future, they’re stored safely in the app for reordering anytime. To get started, just follow these steps:
- Download the app and create an account (if you haven’t already).
- Grab a white sheet of paper (ideally 8.5×11 or larger) and set it on a flat surface in a room with good, even light.
- Take your key off of its keychain (if it’s on one) and place it in the middle of the paper.
- Open the KeyMe app and tap the Scan a Key (or Scan Another Key) button. You’ll see a few tips for getting a great picture.
- Use the on-screen guidance to level your smartphone so that your key photo won’t be distorted. When everything is level, the app will let you know and you can press the big shutter button at the bottom of the screen to take your first picture.
- Flip the key over and take a photo of the other side using the same technique.
- Name and save your key and wait for KeyMe to process it. In a few minutes, you’ll be able to order a copy.
Once your keys are in the app you’re all set. If you lose a key, you can quickly reorder from the app. You’ll have to wait for them to come in the mail, however, so if you’re in a more urgent situation, just visit a kiosk. The app can help you find your nearest location. There should be one right around the corner.
YOU CAN’T BE PERFECT, BUT YOU CAN BE PREPARED.
PREEMPTIVELY REMIND YOURSELF WHERE TO FIND THINGS WITH WUNDERLIST
To-do list apps like Wunderlist do a great job of helping you manage your ongoing tasks, but you can also use them to keep track of your stuff. As an example, let’s say you’re preparing for an important job interview and you want to make sure you leave on time. You’ll need your resume and possibly a portfolio for the interview, plus your wallet and keys since you’ll be out in the world. Instead of just setting a calendar reminder to tell you when to leave to get to the interview on time, you should create a task reminder to help you locate what you need when it’s time to go.
Here’s how to do this with Wunderlist:
- Open up Wunderlist in your web browser, on your computer, or on your smartphone. They have apps for pretty much every possibility and they all sync together, so choose the one you want and create an account (if you don’t already have one).
- Click the + button to add a new list for these reminders. I named mine “Friendly Reminders” but you can choose whatever you like.
- Add a new item to your to-do list by typing it into the input field on your new “Friendly Reminders” (or whatever you named it) list. Continuing with our example, we’ll call it “Get ready for your job interview.”
- That’ll add a new item to the list, but you still have to put in some new details. Click, double-click, or tap on the item (it’ll depend what platform you’re on) to edit its details. Next, used the “Remind me” section to set a time to get notified.
- Now you’ve got a basic reminder, but you need this reminder to help you find the things you need. You can do this a couple of ways, but first you need to put your wallet, keys, portfolio, and resume in their proper places. Once you do, add those items and their locations as a note or as individual subtasks in Wunderlist. If you enjoy checking things off your to-do lists then you might prefer subtasks. Notes offer more space to type so they have their own advantage, too. Whatever you use is completely up to you!
Once you have all of that taken care of you just have to leave your stuff where you put it and your reminder will tell you where to find it when the time comes. I use this method to avoid losing track of things when I have a lot going on. It works well so long as you don’t move things around (or at least update their location in the reminder if you have to).
As you can see, there are plenty of ways to stay organized and avoid losing your stuff. While you can’t make your brain remember everything perfectly, these apps and tips can get you ready for those times when your memory isn’t quite up to the task of locating something important. You can’t be perfect, but you can be prepared.


